Everything you can do in Shiftrio, from setup to the month-end report, step by step with the app’s own screens. The owner can do it all; a branch manager can do everything except creating or deleting branches, company settings, the subscription and making managers.
01
Setup
The app has five tabs: Today, Schedule, Requests, Team and Business. The first setup takes a few minutes.
Account and company
1Sign in with Create an account, Continue with Google or Continue with Apple.
2Choose I own a business.
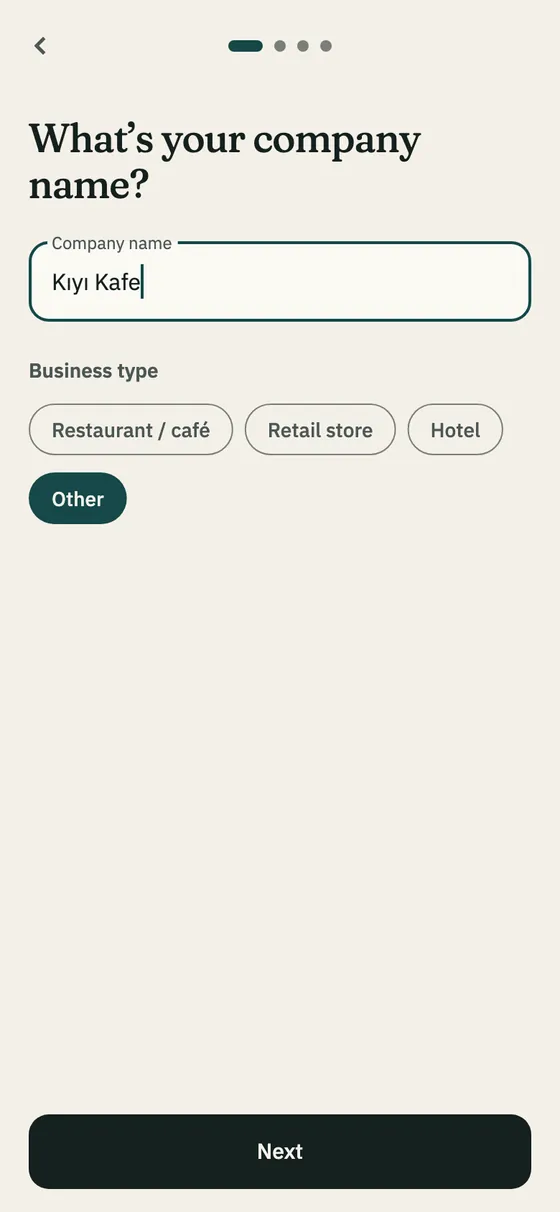
3Type your company name and pick the business type: Restaurant / café, Retail store, Hotel or Other.
4Add your branches; at least one is needed.
5Add your departments, such as floor, kitchen or bar. Each department is created in every branch.
6Pick roughly how many people you employ and tap Finish.
The setup wizard
On first launch, a wizard asks about your team and shift times. You can Skip any step.
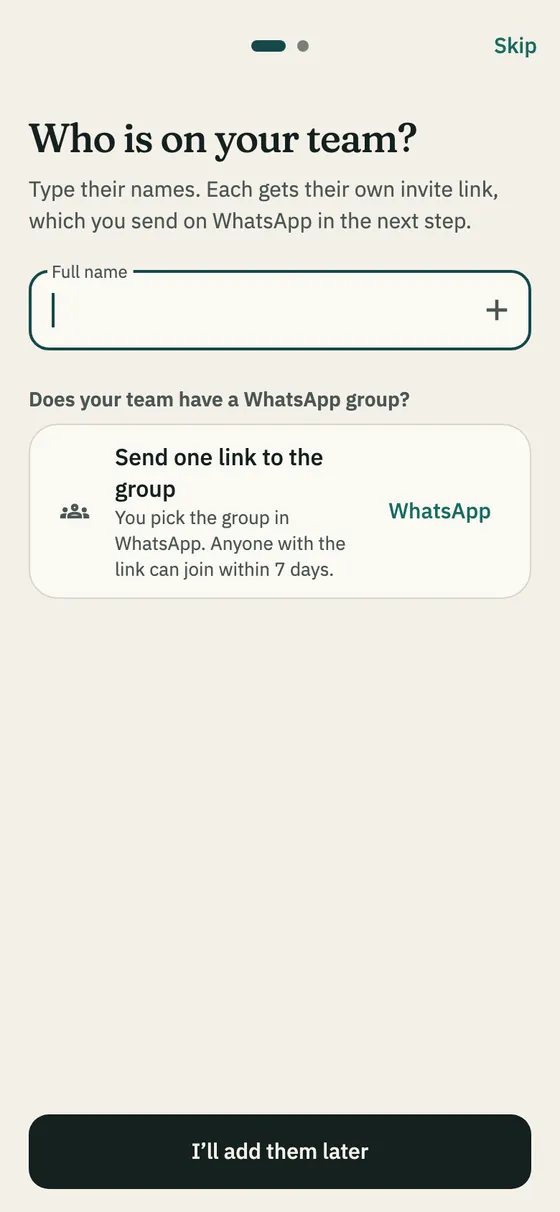
1At Who is on your team?, type each person’s name and add them. Everyone gets their own invite link.
2At Send the invites, send each person their link with WhatsApp, or Send them all in one group message.
3At When are your shifts?, pick the times you use often or enter them with Add hours.
4With Draft next week on, unassigned draft shifts are created at those times for each department and working day.
5Tap Finish setup. The times you picked are saved as the branch’s preset times.
Tip · The Getting started card on Today shows what’s left until your first plan is published: adding your team, planning the first week and publishing.
02
Team
Invite your people
1On the Team tab, tap Invite.
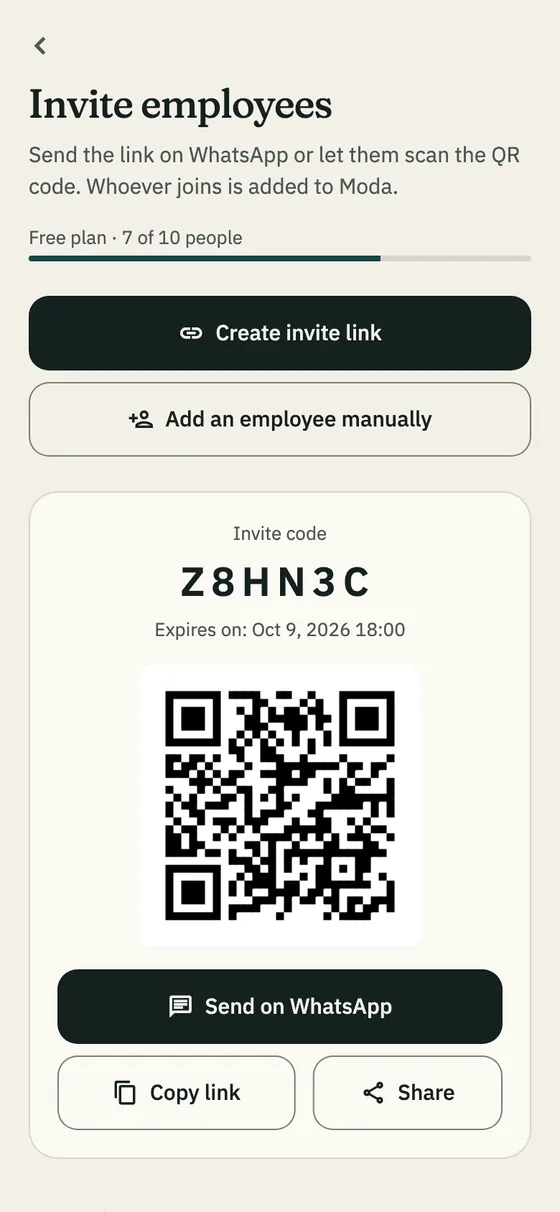
2Tap Create invite link. You get an invite code, a QR code and an expiry date.
3Send it with Send on WhatsApp, Share or Copy link; in person, they can scan the QR code with their camera.
Invite links last 7 days. Under Active invites you can share a link again or close it with Cancel invite.
Whoever taps the link downloads the app and joins your branch.
Add someone who hasn’t joined yet
You can schedule people before they download the app.
1Tap Invite → Add an employee manually.
2Type their name; add their phone, hourly wage and tags if you like.
3Tap Add and create invite code.
Tip · You can schedule them right away; they show as Waiting in the list. Their own invite lasts 30 days, and when they join, their shifts, wage and tags move to their account.
The team list
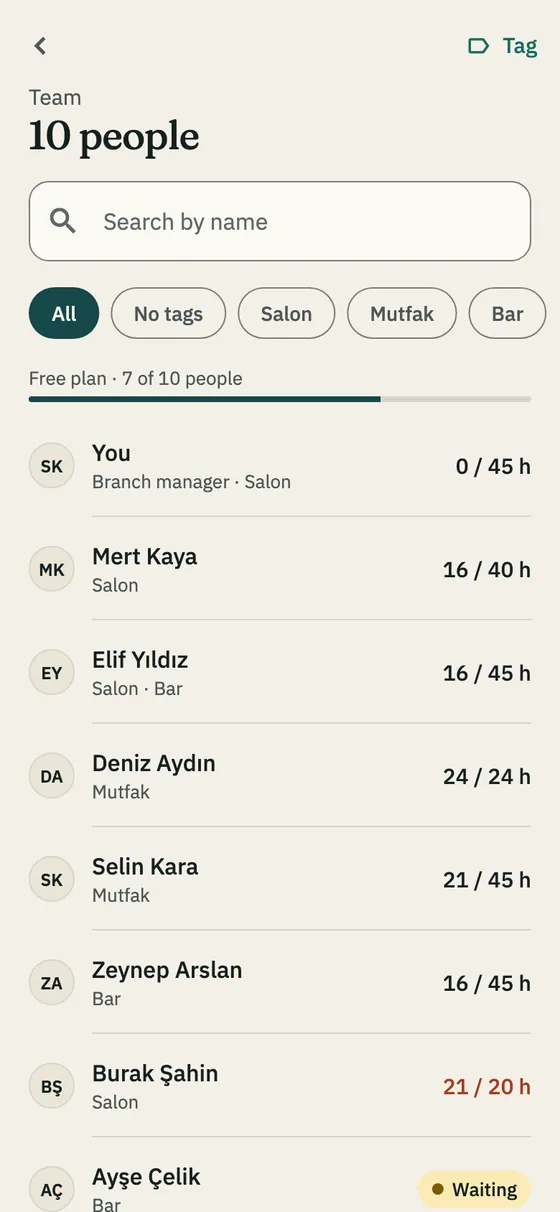
The Team tab shows each person’s planned hours this week against their weekly maximum; anyone over it is shown in red.
The bar at the top shows how many people your plan covers. Near the limit, See plans appears.
Search by name or filter by tag.
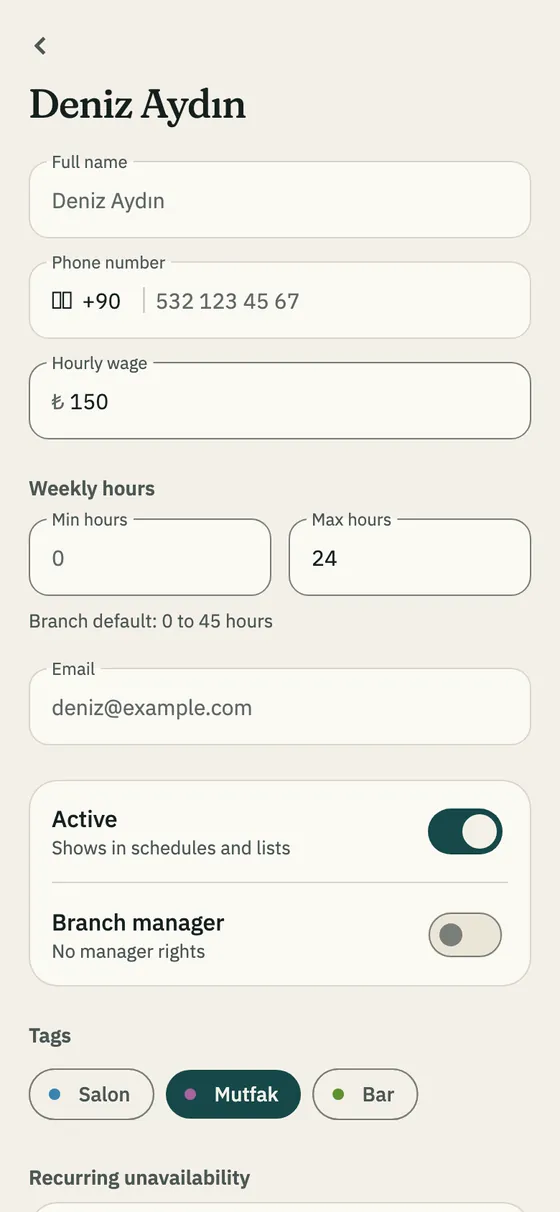
Employee details
Tap a person in the list.
Hourly wage: used in the weekly labour cost and the employee’s estimated pay.
Weekly hours: Min hours and Max hours. Left empty, the branch defaults apply.
Active: someone switched off can’t be scheduled.
Tags: which department the person works in; auto-fill and open shifts go by these.
Branch manager: gives the person manager rights (owner only).
Delete employee: removes them from this branch; their future shifts become open shifts.
Tip · Save your changes with Save. The branch manager switch saves straight away.
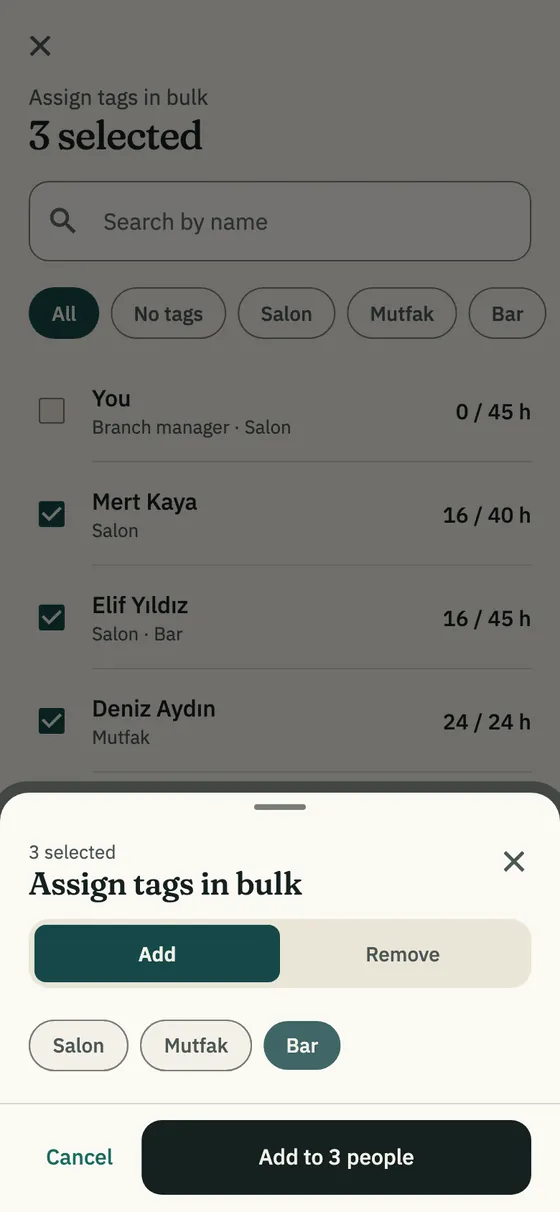
Tag several people at once
1On the Team tab, tap Tag and select people.
2Choose Add or Remove, tick the tags and confirm.
03
Branch settings
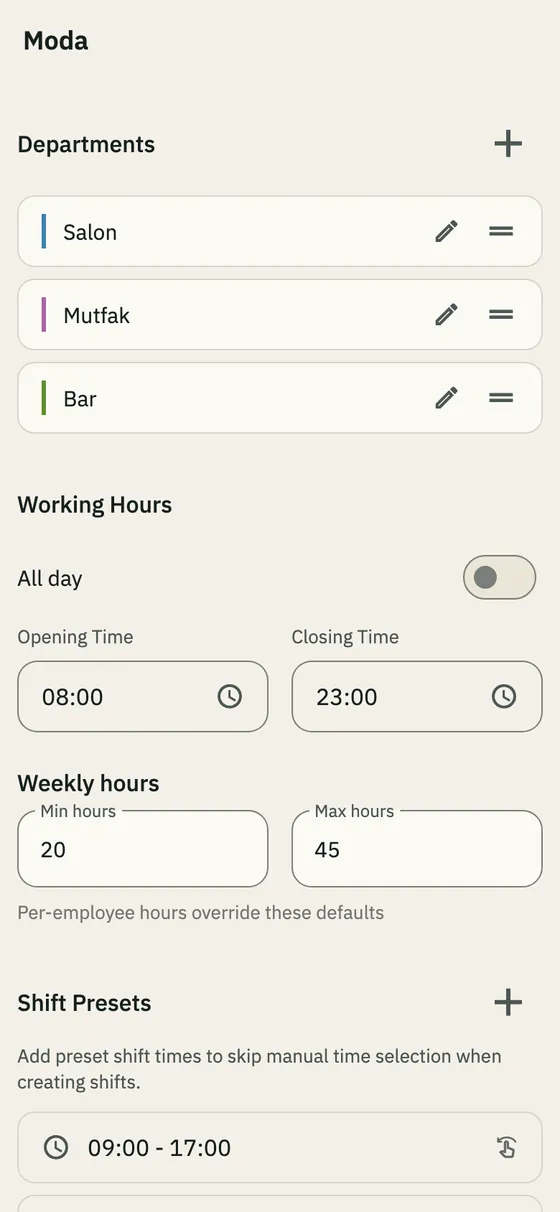
Business → Branch settings. Departments save at once; everything else saves with Save at the bottom of the page.
Departments and opening hours
Under Departments, tap + to add one: its name, color and hours (All day, Same as Branch Hours or Custom Hours).
Tap a department to edit it; drag the handle to reorder. Deleting a department also deletes its future shifts.
Under Working Hours, enter the branch’s opening and closing time. Shifts outside them get a warning.
Tip · Each department also creates a tag with the same name. Give that tag to your people and auto-fill schedules them in that department.
Weekly hour limits
Under Weekly hours, enter Min hours and Max hours per person. A value set on the employee overrides these.
Auto-fill never takes anyone past their max, and gives shifts first to those furthest below their min.
The team list shows anyone over their max in red.
Preset shift times
Save the times you use often under Shift Presets (for example 08:00–16:00). They appear as Saved times when you add a shift, and can draft an empty week for you. Swipe left to delete one.
Shift rules
Add rules such as “at least three people in the kitchen on Saturday” under Shift Rules with +.
1Name the rule; pick the days, departments and tags. Nothing picked means all of them.
2Set Min. Employees.
3Pick the Severity: Warning asks when you publish, Error blocks publishing.
Tip · A department that breaks a rule shows “N people short” on the schedule.
Branches
New branch: Business → Branches → + → branch name → CREATE. The app switches to it and opens the setup wizard.
To switch branches, tap the branch name at the top of the Today tab.
Rename a branch with the pencil, delete it with the bin. Deleting can’t be undone.
Tip · Creating and deleting branches and the company settings are for the owner only.
04
The weekly schedule
The schedule screen
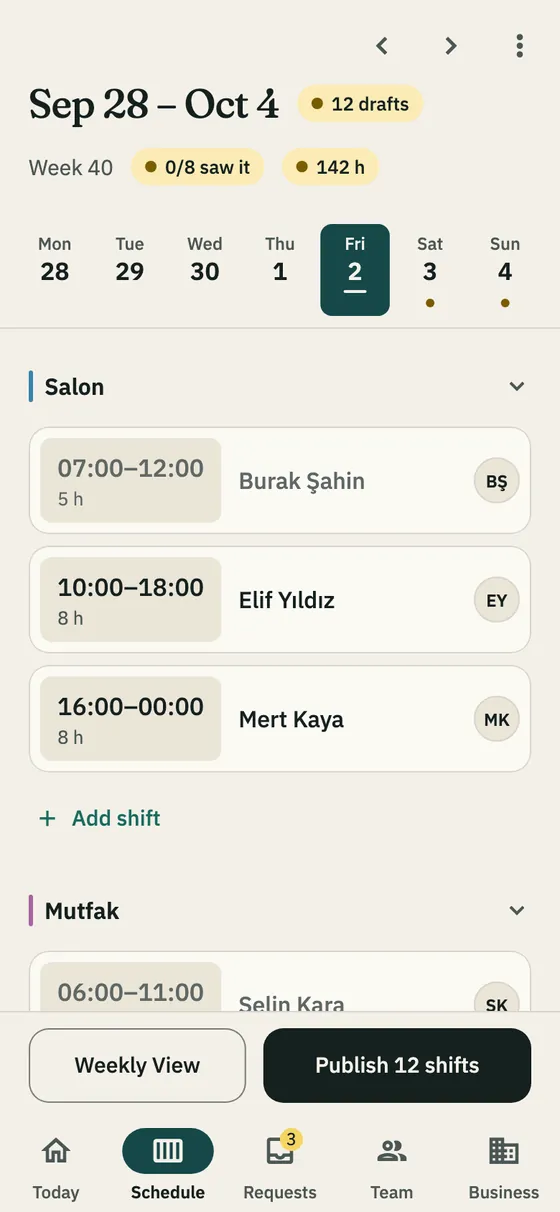
The Schedule tab shows the week by department. Change week with the arrows or by swiping the day strip; Today brings you back.
The header shows the week’s state: “N drafts” while shifts are unpublished, Live once everything is out.
Employees don’t see drafts; they appear once you publish.
A department that breaks a rule shows “N people short”.
Add a shift
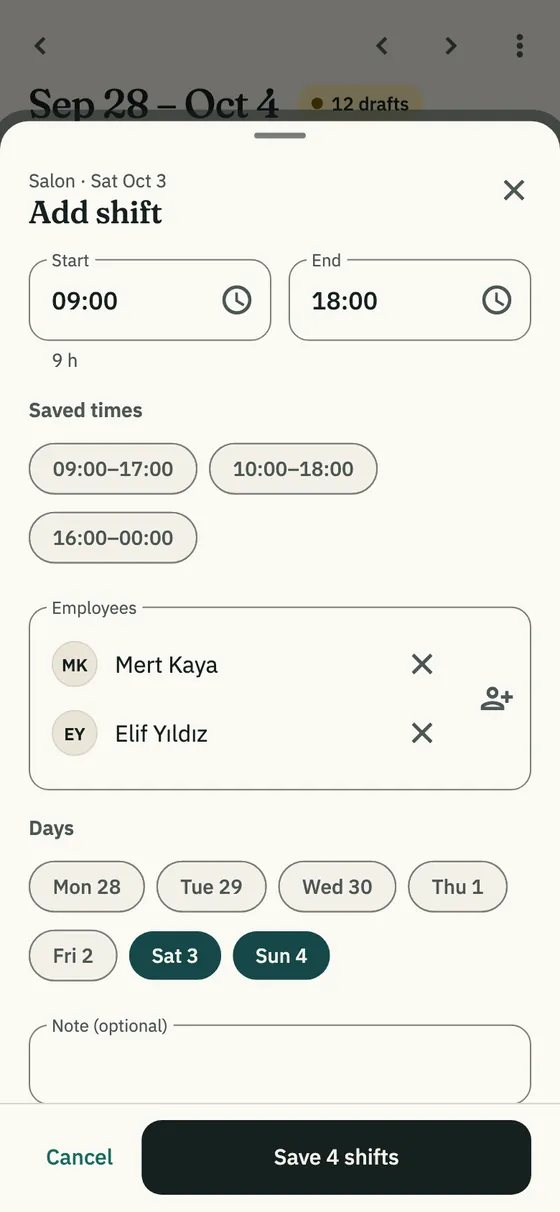
1Tap Add shift under a department.
2Set Start and End, or tap one of the Saved times.
3Under Employees, pick one or more people. The list puts the department’s people first and marks anyone on leave or unavailable.
4To add the same shift on other days of the week, pick them under Days.
5Add a note if you like; the person on the shift sees it. Tap Save.
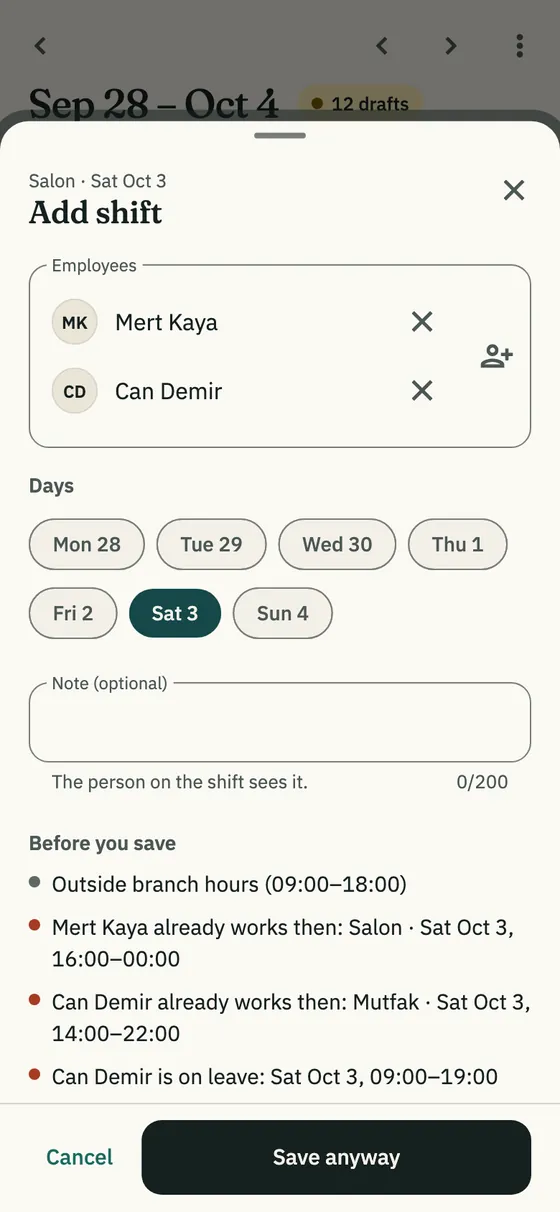
Tip · One shift is created per person per day. Before saving, Shiftrio checks overlaps, leave, availability and branch hours; if something is off you see Before you save and can Save anyway.
Edit, duplicate or delete a shift
Tap a shift to change its time or person. If a published shift changes, the people involved get a notification saying what changed.
Swipe a shift left for Contact (call or WhatsApp), Duplicate and Delete. A deletion can be reversed with Undo.
On an Unassigned shift, tap Assign to pick someone.
Copy and clear weeks
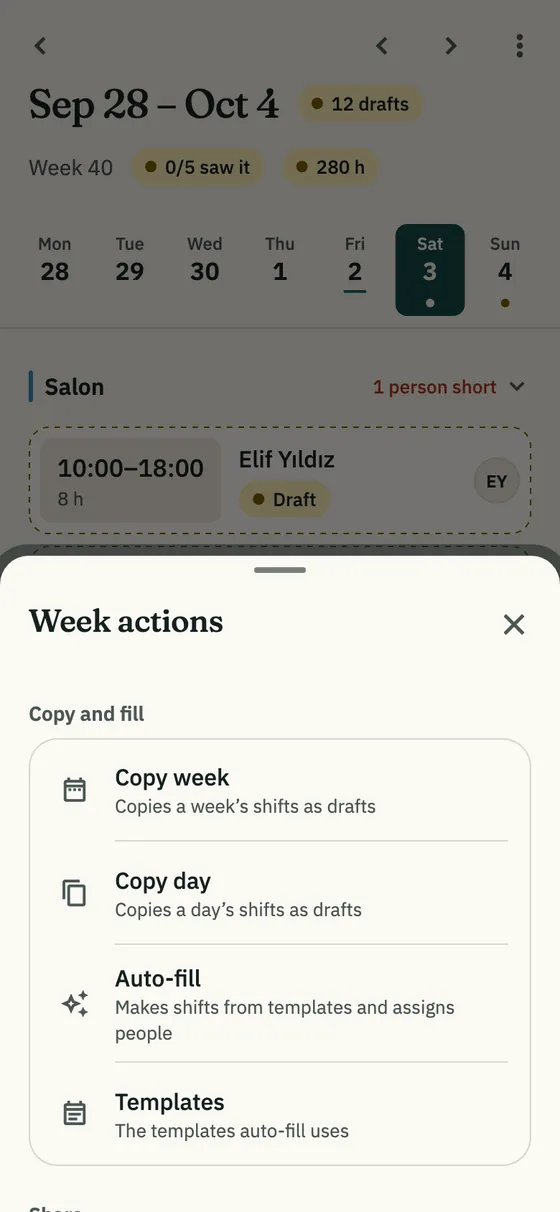
The ⋮ (Week actions) menu at the top right has:
Copy week and Copy day: copy the shifts of a week or day as drafts. Shifts of people who left the team become open shifts.
Auto-fill and Templates (below).
Open empty shifts to the team: offers published shifts with nobody on them to the team (below).
Ask for availability, Share the week view (sends the week as an image) and Add to calendar.
Clear week and Clear day.
Tip · On an empty week, the schedule offers Copy last week, Draft it from your shift hours and Auto-fill as shortcuts.
Templates
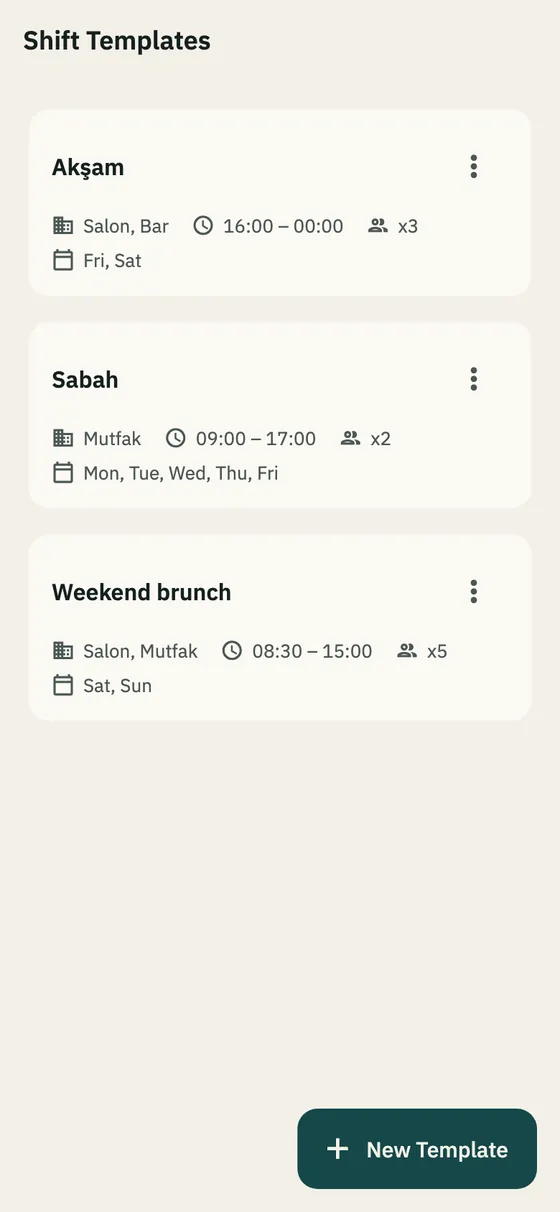
A template is the week’s recurring need: which department, what times, which days, how many people.
1Tap Business → Templates → New Template.
2Enter a name, departments, start and end time and days; set the number of workers per department.
3If some days differ, set them under Custom Day Times, then save.
Apply Template in the template’s ⋮ menu adds unassigned shifts to the week you pick.
Auto Assign fills the same shifts with suitable people.
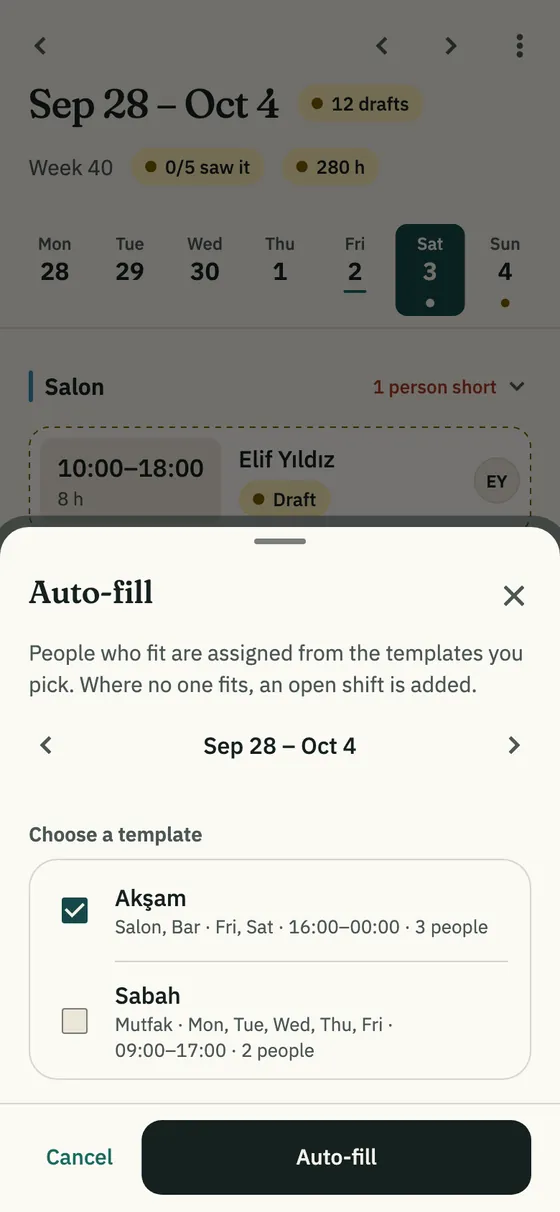
Auto-fill
1Tap Auto-fill in the ⋮ menu or on an empty week.
2Pick the week and tick the templates to use.
3Tap Auto-fill. The shifts are created as drafts.
Someone is put on a shift only if they carry the department’s tag, aren’t on leave then, didn’t say they’re unavailable that day, stay within their weekly max and have no overlapping shift.
Among those who fit, whoever is furthest below their min goes first.
Only the company’s working days and the departments’ hours are filled; a shift nobody fits stays open.
Tip · The result tells you how many shifts were assigned and how many stayed open. Change the draft as you like before publishing.
Publish the schedule
Everyone with a shift gets one notification, and you see “N shifts published. M people notified.” You can then send the plan as an image to your WhatsApp group with Send to the group.
1Tap Publish N shifts at the bottom. Publish on the Today tab does the same.
2Broken Error rules block publishing; for Warning rules you can Publish anyway.
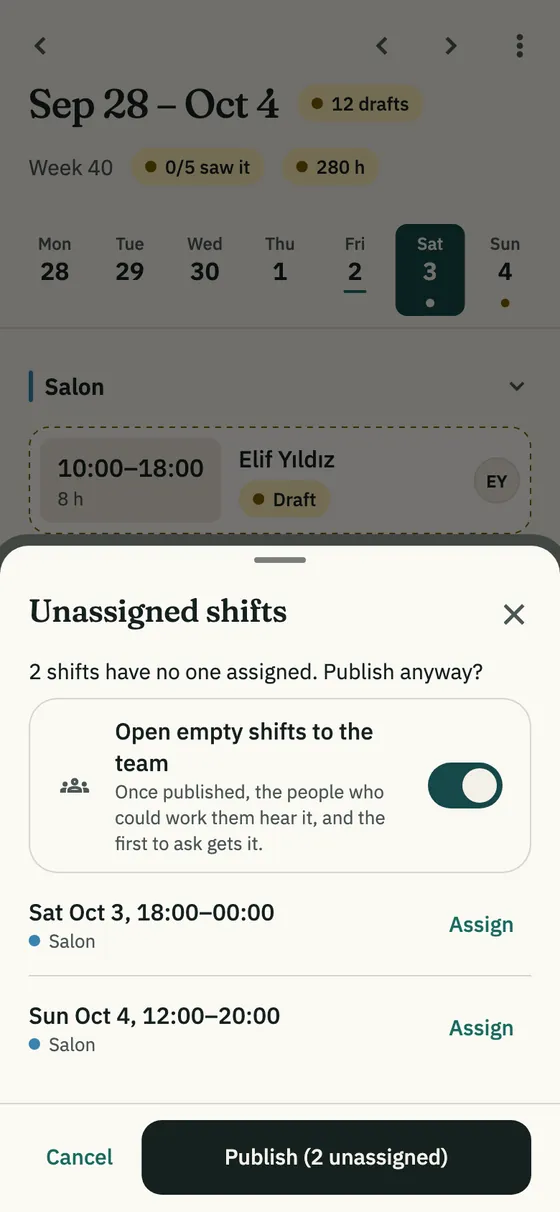
3If drafts have nobody on them, Unassigned shifts opens: assign someone or remove them. Turn on Open empty shifts to the team to offer them to the team as you publish.
4If someone on leave has a shift, you’re asked one last time.
Open an empty shift to the team
When you open a published shift with nobody on it, the people who fit are notified; the first to tap I’ll take it gets it, and you’re told.
⋮ → Open empty shifts to the team, or the switch of the same name while publishing.
The notification goes to employees who carry the department’s tag, have no other shift at that time and aren’t on leave. If nobody in the branch carries that tag, everyone is told.
Opened shifts carry the Open to the team tag.
Weekly labour cost
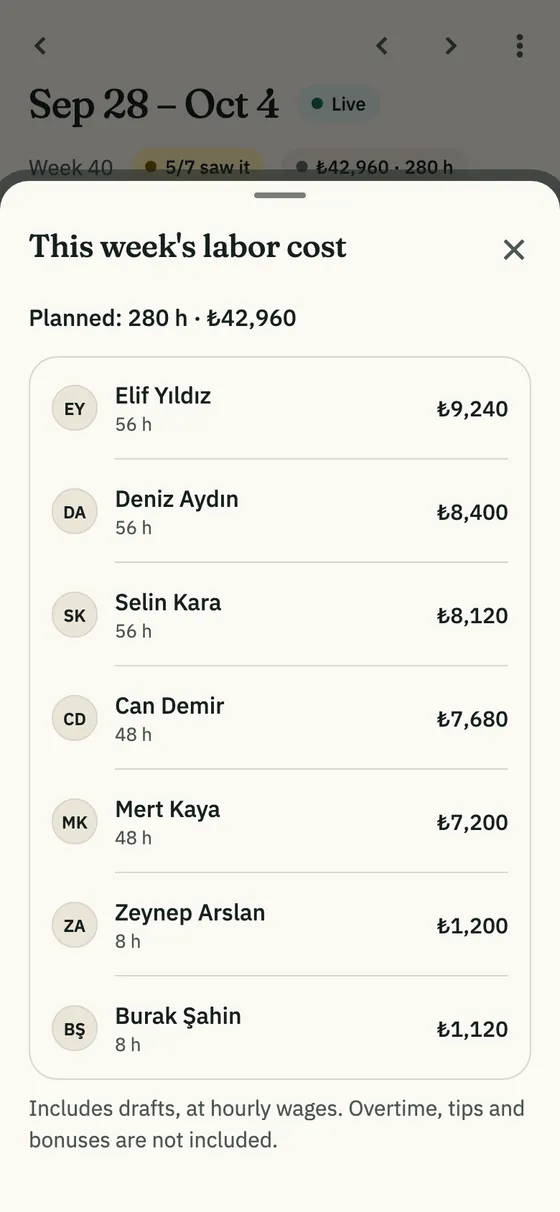
The amount in the schedule header is the week’s estimated labour cost. Tap it for hours and cost per person.
It includes drafts and uses hourly wages; overtime, tips and bonuses aren’t included.
People without a wage show No wage; tap them to enter one.
Who saw the plan
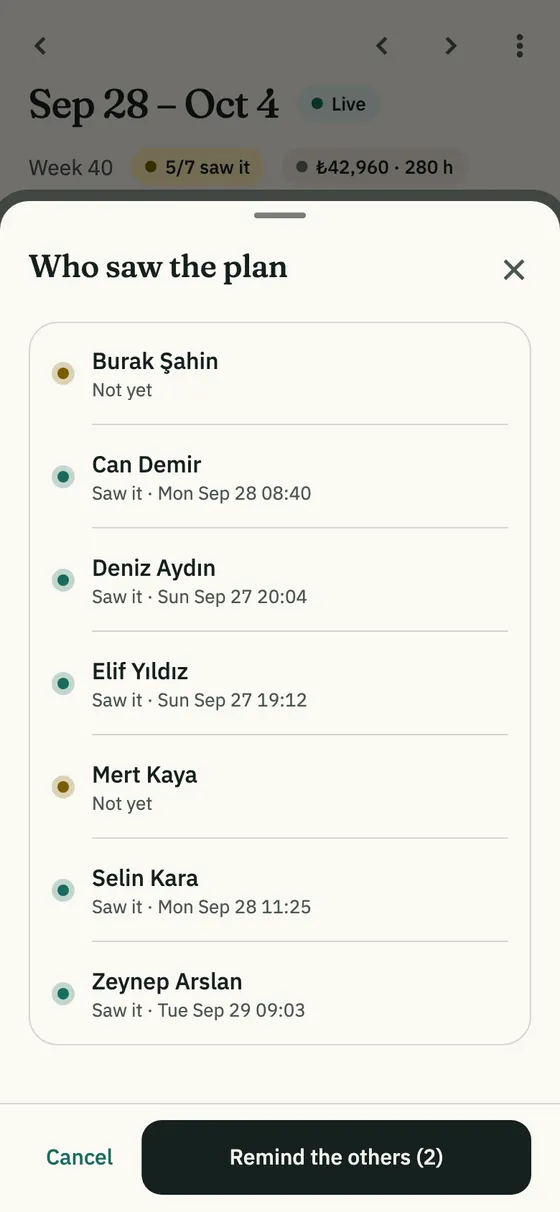
Tap “N/M saw it” in the schedule header: it lists who among the people on published shifts has opened the plan, and when.
Remind the others notifies only those who haven’t seen it.
Ask for availability
Days people can’t work show when you add shifts, and auto-fill skips them.
1Tap ⋮ → Ask for availability.
2You see who has entered their availability and who can’t work which days.
3Ask the others notifies only those who haven’t entered it.
05
Today
The Today tab
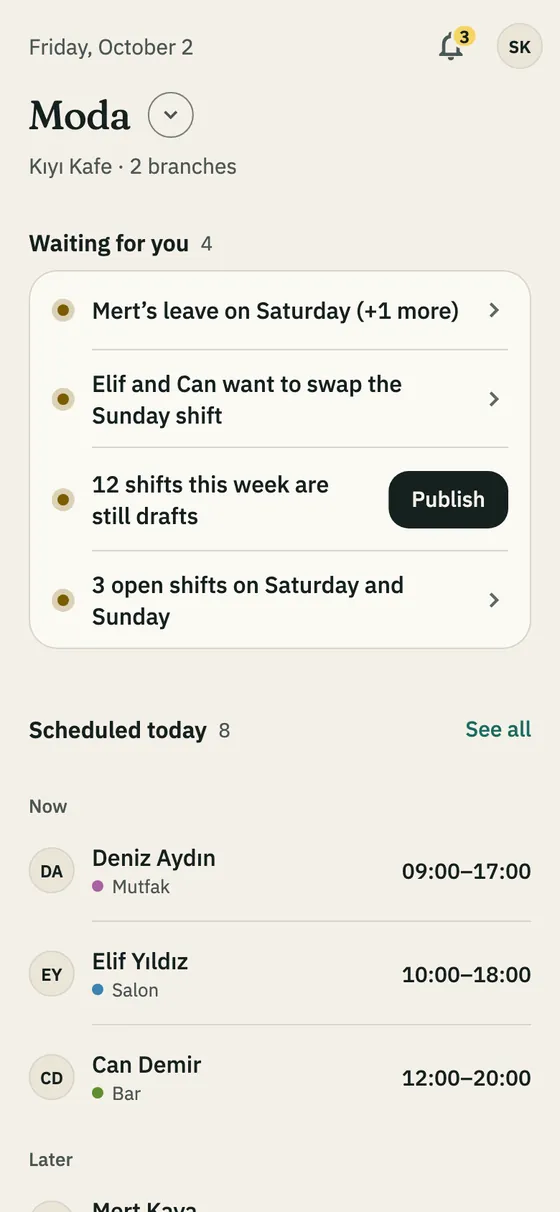
Waiting for you: pending leave, swaps and overtime, people who haven’t joined the app, unpublished drafts and open shifts. Tap a row to go there.
Publish on the “N shifts this week are still drafts” row publishes the plan from here.
Scheduled today: who is on now and later. See all for the full list; tap someone to call or WhatsApp them.
The bell at the top right opens your notifications.
06
Requests
Leave, swap and overtime requests
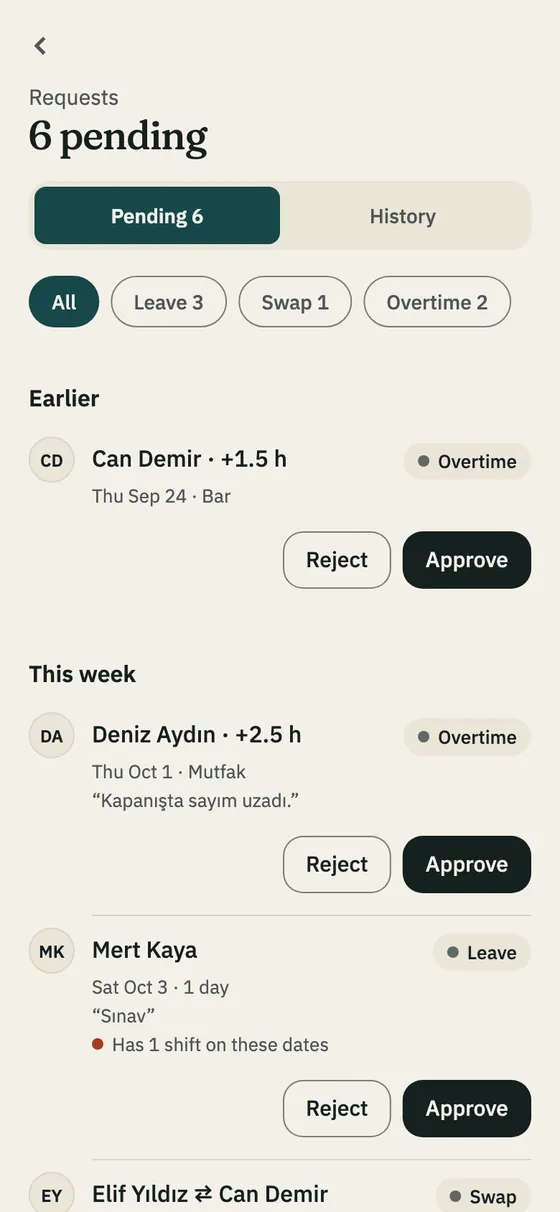
The Requests tab lists what’s pending by kind; the badge on the tab shows how many. Filter with All, Leave, Swap and Overtime; decided ones are under History.
Leave: Approve or Reject. If the person has shifts on those days you’re warned; approving doesn’t remove the shifts by itself.
Swap: the coworker accepts first, then you approve. Approving exchanges the two shifts in one step. Swaps still waiting for the coworker sit under Waiting for the other person.
When you Reject, you can add a reason; the person sees it in their notification.
Tip · A branch manager can’t decide their own leave; the owner approves it.
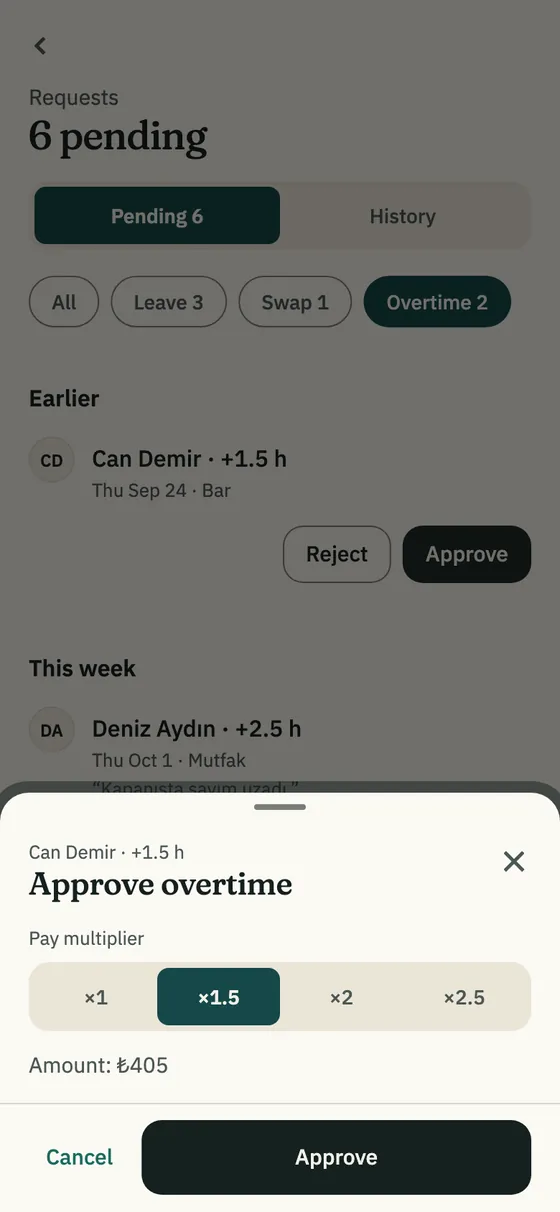
Approve overtime
1Tap Approve on an overtime request.
2Pick the Pay multiplier: ×1, ×1.5, ×2 or ×2.5. If the wage is known, the amount shows.
3Tap Approve. The employee is notified.
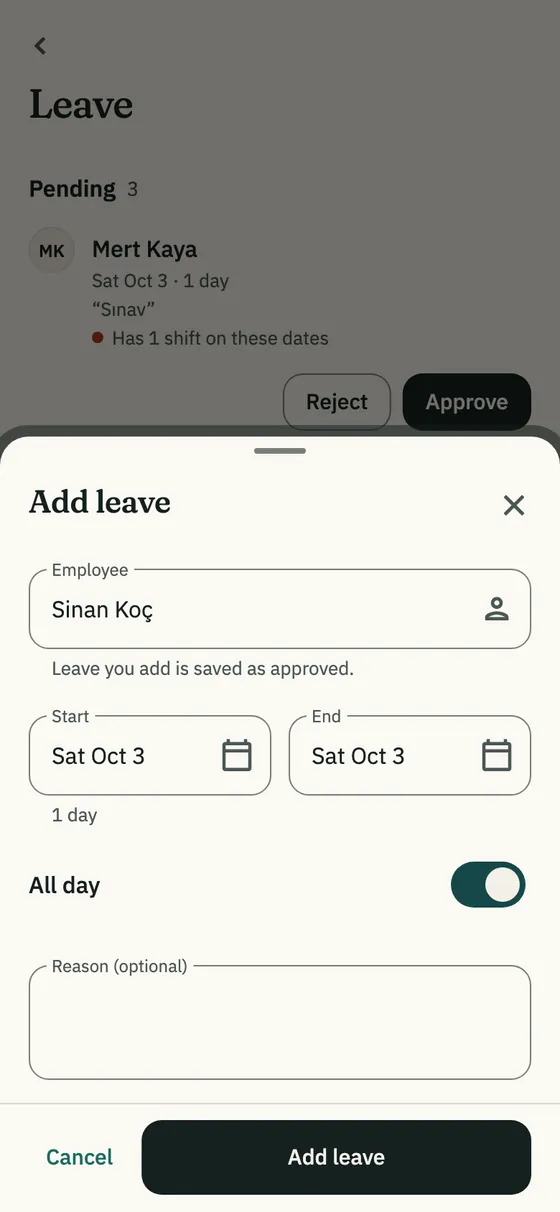
Add leave for someone
Leave you add is saved as approved, and the employee is notified.
1Tap Business → Leave → Add leave.
2Pick the employee, the dates and, if needed, the times.
3With annual leave tracking on, Take from annual leave takes it from their balance.
4Tap Add leave.
07
Time clock and annual leave
Both are optional: turn on Time clock and Annual leave tracking under Business → Company → Features.
Time clock
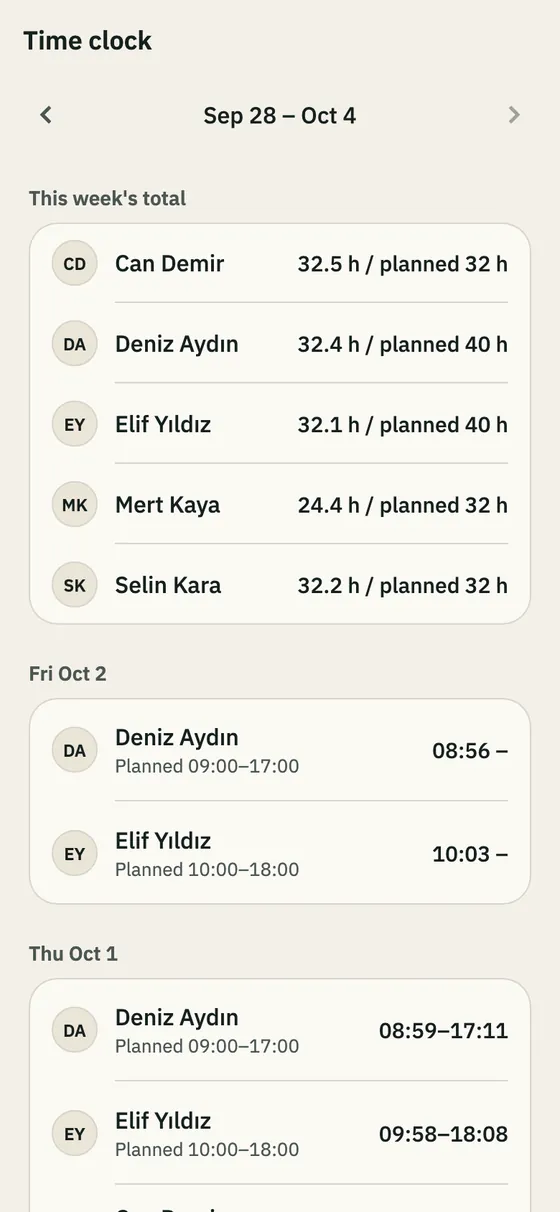
With the time clock on, employees tap Start and Finish on Home during their shifts. The time comes from the server, not their phone.
In Business → Time clock, pick the week. This week’s total shows each person’s real hours against planned.
Each shift shows the planned time and the real start and finish, and how many minutes late if more than 5.
Tap a shift to correct the Start and Finish times, or Clear the times. Corrected ones are marked.
If someone forgets Finish, the shift is closed at its planned end and marked “end taken from the plan”.
Tip · Employees can start an hour before the shift and finish up to six hours after it ends. There is no location or QR check.
Annual leave
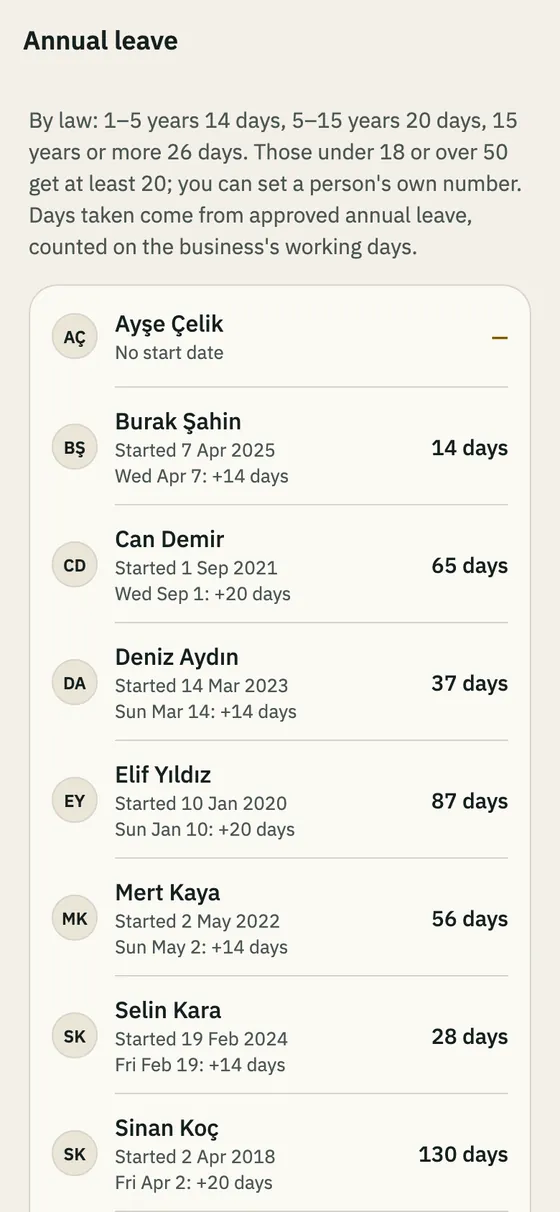
1Open Business → Annual leave.
2Tap a person and enter their Start date. If needed, also enter Days a year and Days left today, then save.
Entitlement follows the minimums of Turkish Labour Law No. 4857, Article 53: 14 days from 1 to 5 years, 20 days from 5 to 15 years, 26 days from 15 years. It’s added on each work anniversary.
Approved full-day annual leave is taken from the balance on the company’s working days; hourly leave isn’t.
The 20-day minimum for people under 18 or over 50 isn’t applied automatically; enter Days a year for them yourself.
08
Announcements
Send an announcement
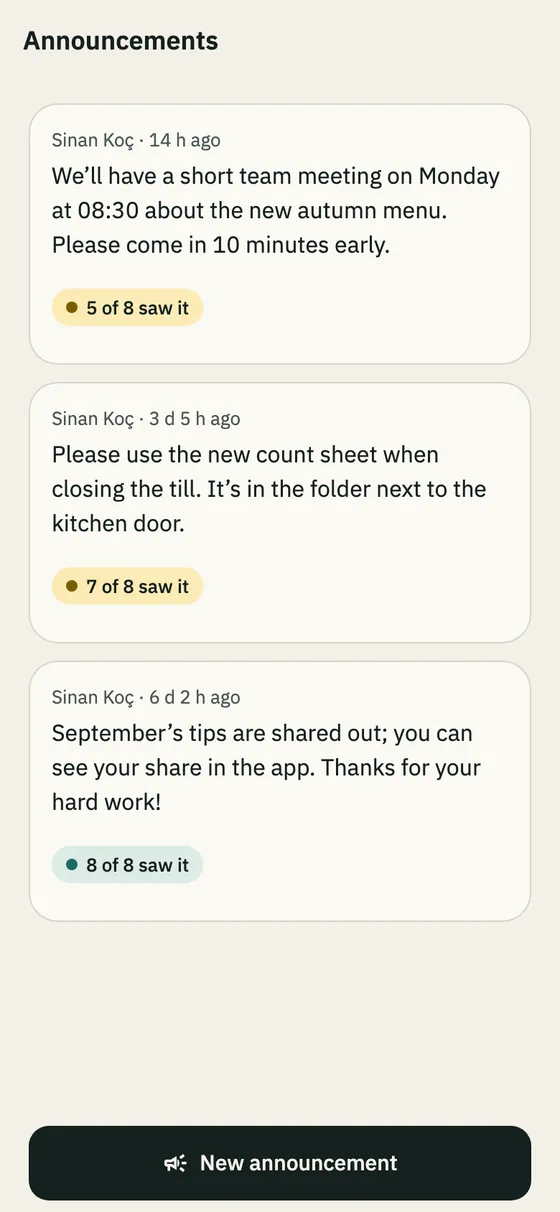
Everyone in the branch is notified and the announcement appears on their Home. Each one shows “N of M saw it”; tap it to see who.
1Tap Business → Announcements → New announcement.
2Write your message (up to 500 characters) and tap Send.
09
Overtime, tips and reports
Add overtime
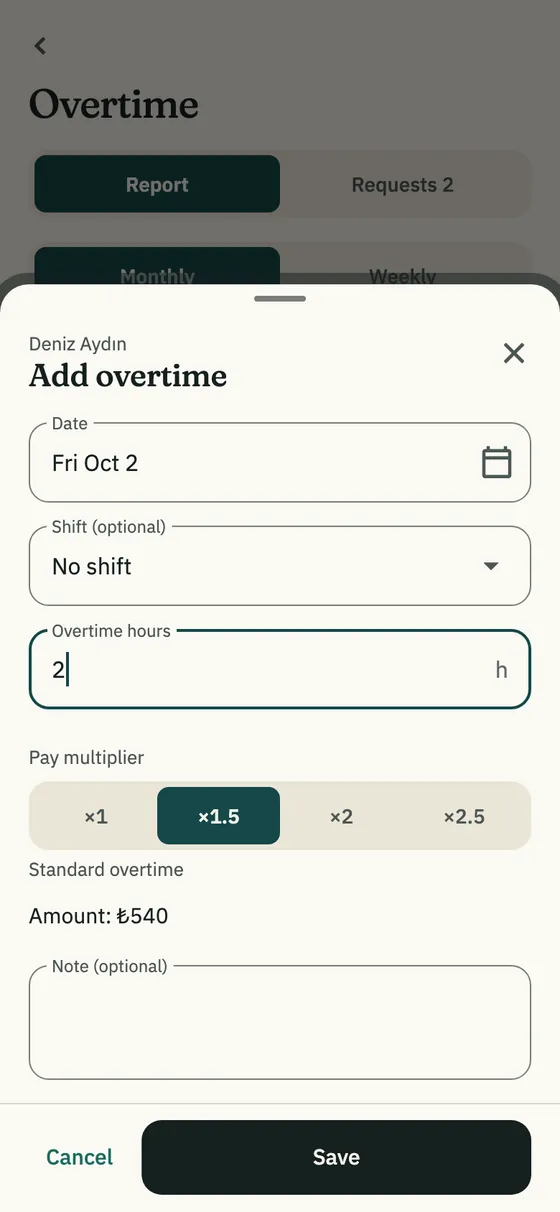
1Tap Business → Overtime → Add overtime and pick the person.
2Enter the date, that day’s shift if you like, and the hours.
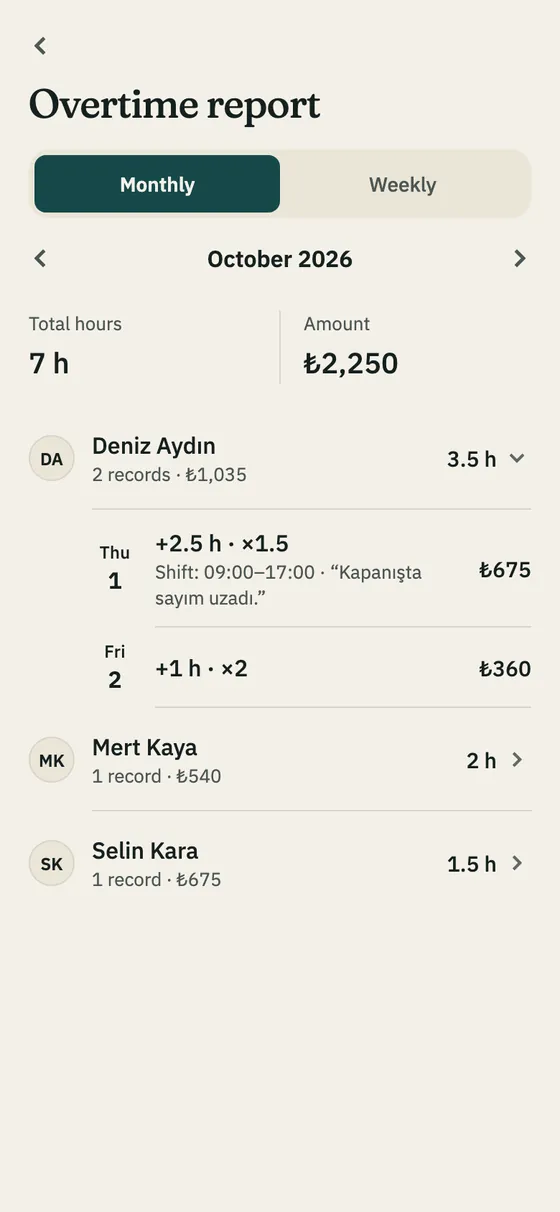
3Pick the Pay multiplier: ×1 at the normal hourly rate, ×1.5 standard, ×2 weekend or holiday, ×2.5 night.
4Add a note and tap Save. The amount is hours × multiplier × wage.
Overtime report
Business → Overtime report shows total hours and amount, Monthly or Weekly. Tap a person to see their records; swipe a record left to delete it.
Tips
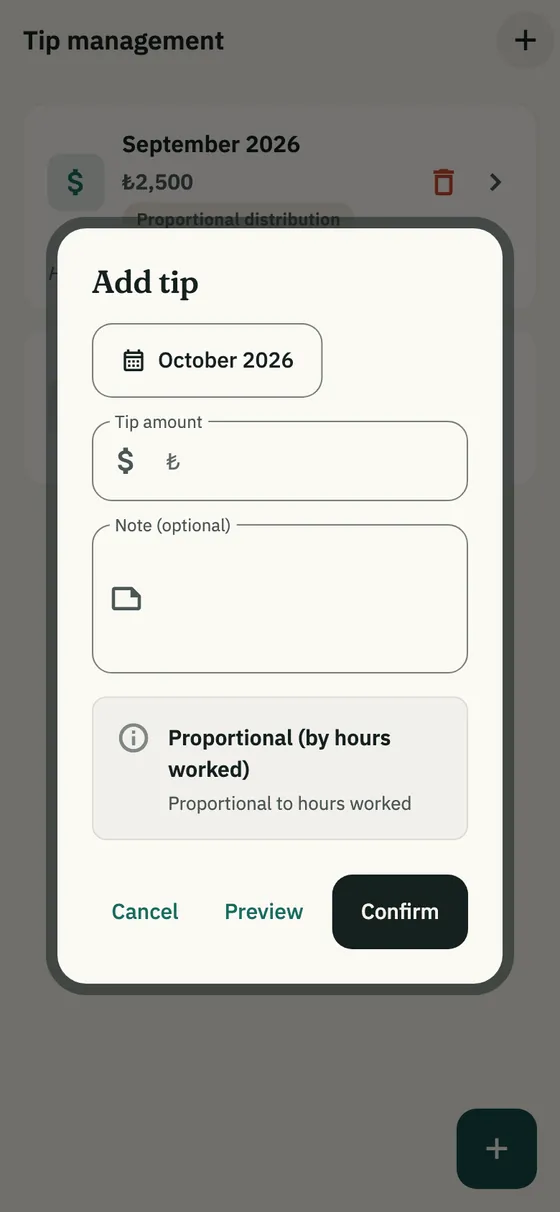
First turn on the Tip system in the Company settings and pick the method: Equal distribution or Proportional (by hours worked). Proportional uses the hours of the month’s published shifts.
1Tap Business → Tips → Add tip.
2Enter the month and the total, with a note if you like.
3Tap Preview to see each share, then Confirm.
Statistics
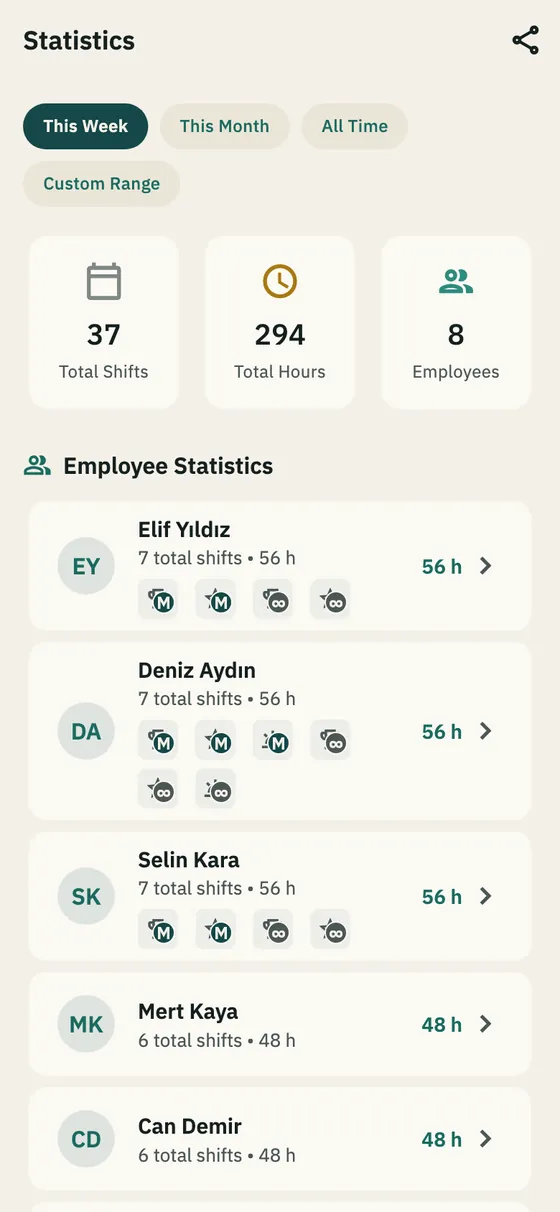
Business → Statistics shows total hours, shift count and average shift length for this week, this month, all time or a range you pick, per person and per department. Export shares a CSV file.
10
Subscription and account
Subscription
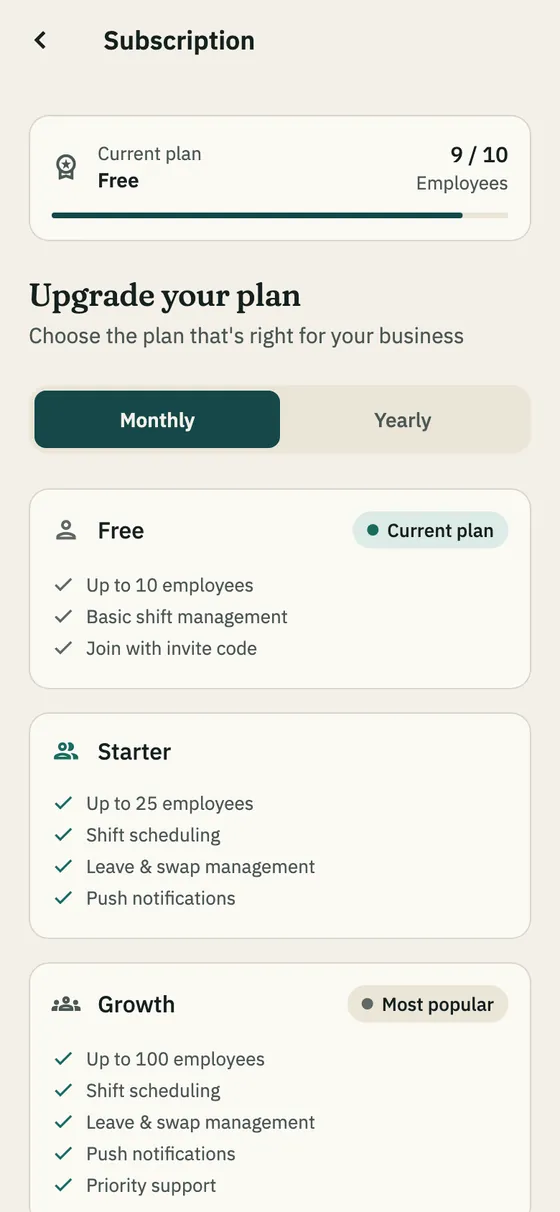
Business → Subscription shows your plan and how many people you have. Plans differ only by team size: Free 10, Starter 25, Growth 100, Enterprise 1,000 people. You pay through the App Store or Google Play, monthly or yearly.
Tip · New phone? Bring your subscription back with Restore purchases.
Company settings
Business → Company changes the company name, business type, currency (TRY, USD, EUR, GBP) and Working Days, and turns tips, the time clock and annual leave on or off. Working days are used by auto-fill and the annual leave count.
Notification settings
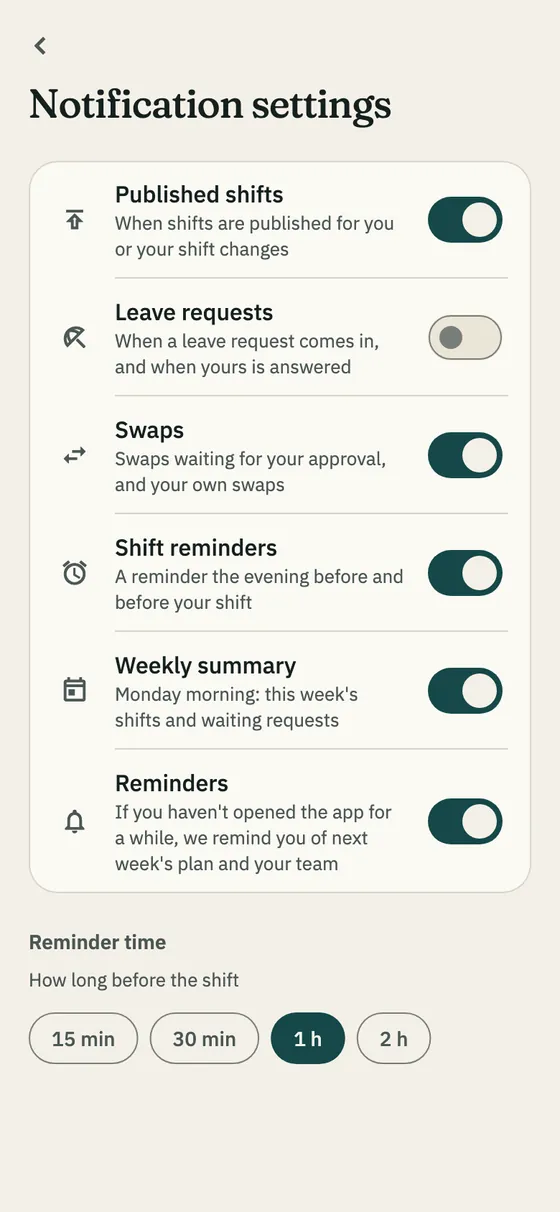
Business → Notification settings picks which notifications you get.
Weekly summary: Monday at 08:00, this week’s shifts and pending requests.
Reminders: if you haven’t opened the app for a while, a reminder about next week’s plan and your team.
Settings and account
Settings changes your profile, appearance and language; write to us from Support.
Delete account: as the owner you can’t delete your account while others are in your company; write to us in that case. Cancel an active subscription separately in the App Store or Google Play.
Get Shiftrio
The week’s schedule, on your team’s phones.
Free for up to 10 people, every feature on every plan. On iPhone and Android, in English and Turkish.